| MV Kit Creator™ Preferences |
The Preferences dialog is viewed by clicking on (Windows) Tools-Preferences top menu, or (Mac) App Menu-Preferences.

Show Wave Display
Checking this causes the Wave Display to show on the Main Interface when you play a Pad, via MIDI or by clicking on it.
Show Progress Pointer
When a wave plays, a progress pointer will travel across it. Unchecking this removes the Progress Pointer.
Extract Samples As...
For the Export WAVES From .MV0 fucntion; determines if the output is WAVE, AIFF, CAF (Core Audio Format), or SND (old-style MPC format).
Middle C Displays As...
On some samplers/keyboards, middle C is defined as C4 (usually U.S.) while others it is C3. The MV-8000 shows it as C3, and by default this is what is shown throughout the program through any Note Number (i.e. A#5, E1, etc.) However, you may feel comfortable seeing it as C4. This control sets the display of Note Numbers program-wide.
Check for Updates
Checking this enables the program to automatically check for updates from the Chicken Systems web site upon startup. This can always be done manually from the Check for Updates menu option under Help.
Create Folder when extracting samples from .MV0
If you extract the samples out of a .mv0 file, this will write a folder with the same name as the .mv0 file and write the samples in there.
Expand Pad Contents when Opening
This pulls out the Pad Contents drawer when you open any type of file.
Show Velocity Meter
This enables the red Velocity meter, next to the Pads, to respond on strikes. The associated parameters determine the behavior of the display.
On .MV0 File Export
These options determine the resulting state of the Project after you export a .MV0 file. You may
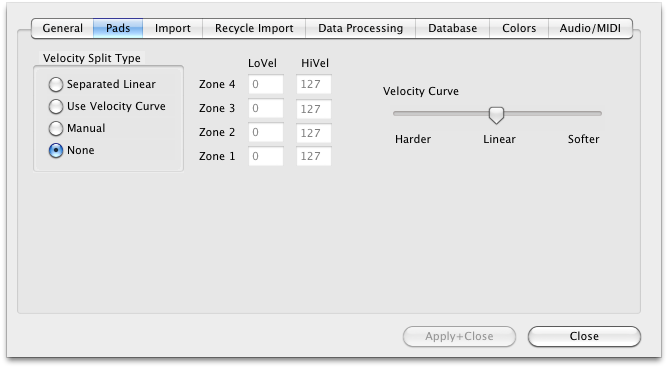
Since a Pad can hold up to 4 samples, you may want to split them via velocity, or layer the sounds, or (rarely) a combination of both.
Velocity Split Type
MV Kit Creator™ provides 4 methods of automatically splitting up your samples on Pad:
LoVel, HiVel
These either show your velocities, or in the case of Manual, allow you to fill in your own.
Velocity Curve
Enabled when "Use Velocity Curve" is selected under Vel Split Type. Moving the sliders changes the numbers within the LoVel-HiVel boxes.
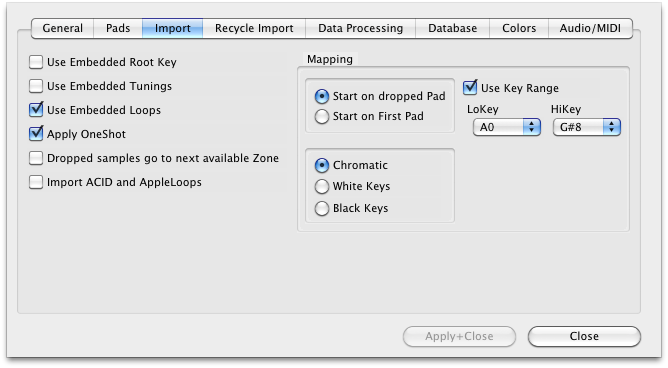
The samples that you import into your Project may have some embedded information in them that you may want to use: Root Key, Tunings, or Loop information. The first three checkboxes determine which you want to use.
Apply One Shot
Since the MV8000 is primarily a drum/percussion player (although it doesn’t have to be), many times you want the incoming sample to be programmed in it’s Partial to play as One Shot (meaning, once you play it, it plays all the way to the end without regard to pad/key release). Checking this makes sure One Shot is applied. (Note: if One Shot is applied, loops are ALWAYS turned off.)
Dropped Samples go to Next Available Zone
Shows the Properties of the Output you selected on the left.
Import ACID and AppleLoops As Such
ACID files and AppleLoops are the same as Recycle files - one or two channels of audio, along with a set of markers to define where the transients start, so a slice player can play them back at different tempos without changing the pitch.
MV Kit Creator™ now imports slice formats - Recycle, as well as ACID and AppleLoops.
Unfortunately, ACID files use the .wav extension and AppleLoops most often use the .aif or .aiff extension, so they are disguised as WAVE/AIFF files. MV Kit Creator assumes these files are WAVE/AIFF UNLESS this is checked. When checked, MV Kit Creator imports ACID and AppleLoops like it imports Recycle files.
Mapping
These define how imported samples are placed in your Project, start from which Pad gets the assignment, how they get spread out (chromatically or on only black or white “keys”), and what range handles the import
(Note: this also applies to ACID files and AppleLoops.)
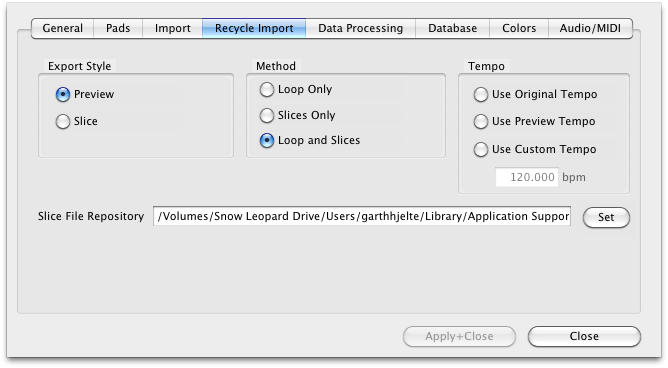
Export Style
(Recycle only) This is a little technical, but thsi relates to the Recycle internal methods of extracting slices. If you get “clicks” on the start of certain slices, try the other method.
Method
Loop Only simply extracts the entire loops as one file, BASED ON THE TEMPO FUNCTION. Slices Only extracts the slices from the lowest to the highest, and Loop and Slices does both - the loop precedes the slices.
Tempo
This involves when you extract the entire loop. Use Original Tempo extracts the sample data as-is. Use Preview Tempo applies to Recycle only and it pays attention to the Preview Tempo parameter inside the Recycle file. Use Custom Tempo allows you to customize the tempo so the extracted loop will be that tempo.
Slice File Repository
This is the area on your system where the extract loops or slices will be stored. They are needed post-use because your Projects need them for later usage, or you may want them for other reasons. (You do not need them if your goal is to simply create .MV0 files in the same session.)

To confuse the sample vs. loop issue further, you can import WAVE/AIFF files that have not been beat detected (that is, the transients have not been calculated) and MV Kit Creator will detect those transients and import them like Recycle/ACID/AppleLoops.
But, let’s talk about what a “slice file” is.
What Is A Slice File
A WAVE or AIFF file is simply a piece of audio data. And any “slice file”, such as a Recycle file, ACID file, AppleLoop, or Stylus RMX file, are just pieces of audio data as well.
The only difference between a regular sample file and a slice file is that a slice file has markers written in a information chunk in the file. These markers are placed strategically where transients (sharp sounds) in the file start, so a player that reads slice files knows where the slices are. This is how a Slice File can be played back at various tempos: the player plays back a slice at the position the tempo dictates. At faster tempos, the slices fade out to make way for the next slice; at slower tempos, there is a gap between the slices. (However, some players artificially add sample data to “plug the holes”. Also, good Slice Files are originally recorded at the slowest tempo reasonably allowed, so they never have to be played back at a slower tempo than their “unity tempo”.)
To create a Slice File, one has to “slice” the audio into slices of energy (“beats”) so the playback engine plays it back in a way that makes rhythmic sense. This requires a beat detector.
Slice editors, most notably Recycle, but also ACID itself and the AppleLoop Utility that Apple provides, have beat detection. They do 2 things: They beat-detect a sound file, plus they can play the slice files back at different tempos. They do this with the assistance of the detected markers. Once you have what you want, then you save into a slice file, where the audio stays constant but the markers are written in the file. So when a slice player reads the file, the slices are the secret to it’s capability to play them back at any tempo.
MV Kit Creator’s Beat Detection
MV Kit Creator now has a Beat Detector, giving the ability to import Slice Files. Anytime you import a Recycle file, or a ACID/AppleLoop (when Preferences - Import - ACID/AppleLoops is checked), MV Kit Creator pays attention to Recycle Import Preferences and imports the loop on the desired Pad or splits them up on adjacent Pads.
It is vitally important to pay attention to these Beat Detector preferences. The defaults work for most clear and simple beats, but they definitely will not work with everything. You will need to experiment with these on a case-by-case basis, but keep trying, there usually is a solution to any rhythmic piece of data.
Here is the explanation of the Beat Detector’s parameters:
Importing Slice Files is not as seamless nor as perfect as it appears. But it is very doable, don't let these options deter you.
Pitch Detection
As has been cited before, the Roland MV-8000 isn’t just a drum/groove box that plays back drum sounds at unity pitch when hitting a pad. It is also designed under the hood as a sampler that plays back chromatic sounds like a piano, trumpet, or electric guitar across a keybaord. This enables you to use the MV-8000 as an all-in-one song creation tool.
Pitch Detection is helpful making a chromatic instrument out of bunches of WAVE/AIFF files. Try dropping a host of WAV files of a multisampled trumpet, and MV Kit Creator detects the pitch of each sample and places it on the appropriate Note (pad) for it’s pitch, and then sets KeyRanges to fill up the spaces in-between the notes. All of a sudden, you have a trumpet sound on your MV without the work of applying the proper rootkey and keyranges.
The Pitch Detection parameters determine how accurate or precise the pitch detection is. Pitch detection does rely on certain variables so different types and styles of pitch detection do a better or worse job than others. Try what seems best for you.

Search Conditions
When searching for a file, or how a file is tagged, these are the search conditions that apply to your criteria.

Might as well make your Wave Display look great, right? These are the options you have on what your Wave Display looks like.
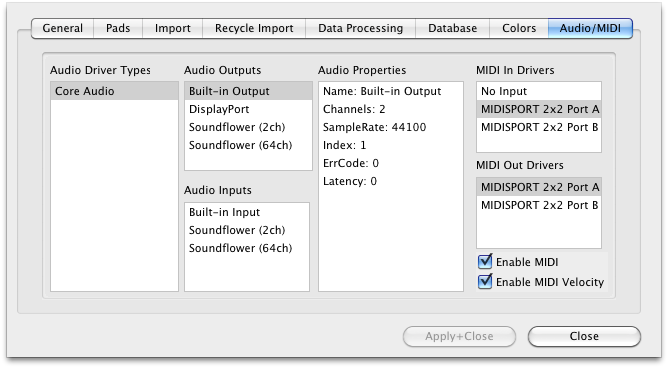
Audio Driver Types
These are the Sound Driver types on your system. Selecting one shows the Audio Outputs and Audio Inputs on the lists to the right.
Audio Outputs
These are the outputs on your system for the selected Audio Driver Type. Selecting one selects the audio output for your app.
Audio Intputs
These are the inputs on your system for the selected Audio Driver Type. Selecting one selects the audio input for your app.
Audio Properties
Shows the Properties of the Output or Input that is selected on the left.
MIDI In Drivers
Allows you to select the current MIDI In driver that will drive the player in MV Kit Creator™. (Note: not applicable in MV Kit Creator™ Free.)
MIDI Out Drivers
Allows you to select the current MIDI Out driver that your application will send MIDI out from. (Note: not useful in MV Kit Creator™ LE or MV Kit Creator™ Free.)
Enable MIDI
Enables MIDI communication. (Does not have any effect in Free version.)
Enable MIDI Velocity
When unchecked, all MIDI notes coming in will be 127 in value.